May 2026
USING A QUILTER'S CLAPPER FOR PRESSING
Happy May 2026. I love the "May Day is Lei Day" custom in Hawaii. Everyone is decked out in beautiful flower circlets and the aroma is heavenly. Here in our neck of the woods, May First can be a flower celebration of sorts with people wearing flowers and dancing around a May pole.
This month we have Cinco de Mayo, Mother's Day, Armed Forces Day, and Memorial Day. Some other fun days I may celebrate: May 11 Eat What You Want Day, May 14 Dance Like a Chicken Day, and May 26 Blueberry Cheesecake Day. Lots to look forward to, especially, that cheesecake. Actually, it might be fun to dance like a chicken while eating blueberry cheesecake, that would encompass all three days at once.
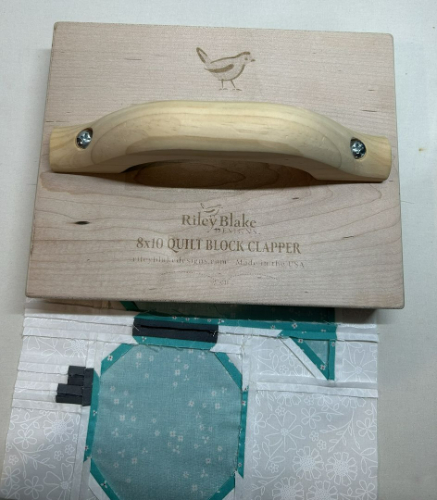
This month's tidbit deals with the use of a quilter's clapper for pressing fabric, quilt blocks, and seams. One of the great tools I purchased recently is a Riley Blake block pressing clapper that measures 8 x 10. It is big, has a nice heft, and really has made a positive difference in the flatness of the seams on my projects.
My Rowenta steam machine gave up the ghost a few of months ago and my every day Black and Decker steam iron was just not cutting it, so I thought I would give a clapper a try. I went online and searched for quilter's pressing clappers. Most of the ones I found were a bit small, lightweight, and just too namby-pamby for my taste. I found this Riley Blake 8 x 10 Block Clapper. It is a clapper on steroids, but it works a treat. A clapper of this size is a bit pricey, but costs much less than buying another Rowenta Steam Machine, plus it takes up less space and does not require that continual monthly maintenance I was forced to do. This has been a win-win solution for me.
In writing this tidbit I did a search on Etsy and found quite a variety of quilter's clappers available. I could not locate the clapper I purchased, but there are so many others to choose from. An additional search of Amazon and various online quilt businesses yielded the same. Although I did not locate the exact clapper I purchased, if you wanted a large one like mine, Etsy shops seem to have the most variety of sizes. Make sure to look for a clapper made of a hard wood.
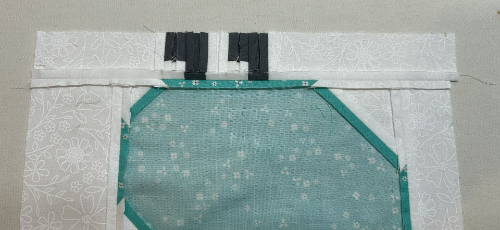
For the quilt I am making, there are lots of seams in three focus blocks featuring pieced ducklings. I am pressing these seams open. This picture shows seams that have already been pressed with a steam iron. They are not quite flat enough.
To make them flatter, you simply place the clapper on top of the seams right after steam pressing:
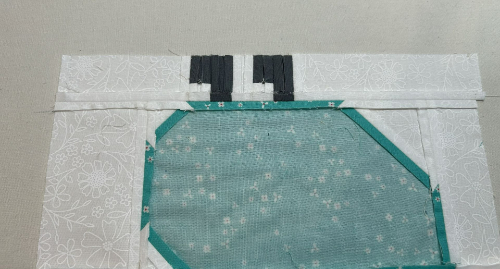
And voila! Here are the same seams after employing the clapper, much flatter than before. Next turn the block face up and repeat the process.
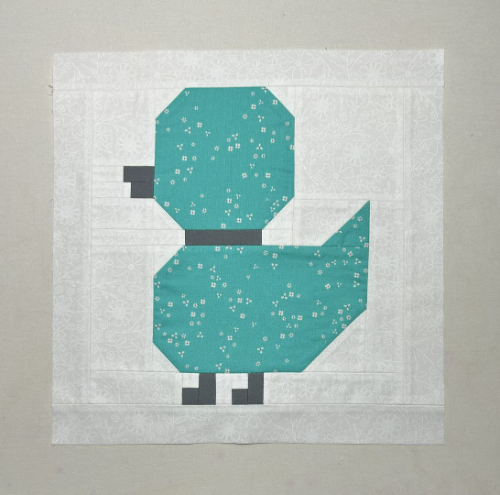
The end result is a nice flat, unfinished size 12-1/2 x 12-1/2 inch square block that will fit nicely in my "Duckling Duckling Go" quilt. (quack!) Only two more duckling blocks to go!
This tidbit is short and sweet. I hope to be back for June, otherwise I will try again in July. Let me know if there is a topic you would like me to research and something that I can write up in a tidbit. Blessings to you and your family.
 Turn On/Off Automatic Slide Show (Forward Direction)
 Turn On/Off Automatic Slide Show (Reverse Direction)