March 2026
A DISCUSSION OF FUSIBLE INTERFACING
Happy March 2026. This month includes a return to Daylight Savings Time, Saint Patrick’s Day, and the beginning of Spring. I am so looking forward to seeing baby ducks waddling along after their mothers and viewing plenty of beautiful birds flitting around the village. The topic for this tidbit deals with interfacing, the fusible kind of interfacing.
Years ago, when I was a teenager, I worked for a tailor after school, on school breaks, and during the summer. I hand stitched in lots of interfacing fabric. In those days interfacing had to be sewn in carefully so that it provided structure for the garment in which it was to be installed but it had to become invisible to the outside of the garment. Most of my work was hand stitching interfacing into yokes, collars, cuffs, pants and jacket plackets, and reinforcing lapels where the buttons and buttonholes would go on shirts, blouses, and jackets. The interfacing was placed between the garment fabric and facings and/or linings. I learned how to create stitched tacks and run long stitches that would hold the interfacing in place. All stitching had to be invisible from the outside of the garment. At that time, we had no fusible interfacing available. Come to think about it, if it was available, the tailor I worked for would not have used it anyway, he was quite the traditionalist.
First, let us define the term interfacing: (source, DuckDuckGo Search Assistant, Wikipedia, and corefabricstore.com)
"Interfacing is used in sewing to add structure and stability to fabric, helping to reinforce areas like collars, cuffs, and buttonholes. It prevents fabrics from stretching out of shape and enhances the overall durability and appearance of garments."
Interfacing is typically a piece of fabric used for these purposes listed in the definition above. Interfacing can be made of a variety of materials such as cotton, polyester, and other synthetic fabrics.
As I stated, in the past, you needed to sew in interfacing to use it. Now, in addition to the sew-in type of interfacing, you can use iron on fusible interfacing. This interfacing comes in various weights, depending on the results you are trying to achieve. With light weight fabric you would use light weight interfacing. If you want a firm or crisp result, you would go to a medium or heavy weight interfacing. There are lots to choose from. There is even interfacing that is thick with foam. This type of interfacing is used to strengthen and reinforce the sides of durable bags and totes.
Okay, so what does interfacing, fusible or otherwise, have to do with quilting? These days we have lots of options to create quilts. Fusible interfacing fabric can be used in our quilting projects to make T-Shirt Quilts; assist in piecing batting scraps to make a batting piece large enough to sandwich into a quilt; to anchor applique' pieces; and to anchor fabric pieces used to create collage quilts, portrait quilts, landscape quilts, and free form quilts known as "Improv".
You can buy interfacing with fusing on one side, or on both sides. Some have paper you peel off; some simply have glue that is activated by heat from an iron. There is even fusible powder available if you want to glue down stuff without the hassle of including a piece of fusible material in the resultant project, but I digress from the topic of fusible interfacing.
When I have purchased fusible interfacing for past projects, I usually bought Pellon products. They are readily available and the price is fairly reasonable. These products usually come in 20-inch widths and can be purchased by the yard. If the fabric has not aged too much in the supplier's store or warehouse, then the glue will bond well to your fabric when the heat of an iron is applied. If it is too old, the glue does not bond well and may separate after you have completed your project, which brings its own set of uncomfortable consequences. No fun ripping out and redoing.
Nowadays, more and more fusible interfacing products are available on the market. If I am making something using a pattern, I will attempt to procure the fusible interfacing suggested by the designer as stated in the pattern. I have learned to shop for pre-packaged fusible interfacing that has not been left on a shelf overlong. Always make sure to test out the bonding of the product prior to putting it into your final project. It will save you headaches later.
For some time, I have been using a product from "The Warm Company" called Steam-A-Seam 2, Double Stick Fusible Web. It comes with peel off paper on one side and a printed grid paper on the other. You can print or trace your applique' item on the grid side. Remove the plain paper on the other side. Stick it on the applique' fabric. Then you cut out the item, peel off the grid paper, and place your item on the background fabric.
What is really great about this product is that it has a tacky adhesive that allows you to stick down the fusible on the fabric without ironing it permanently in place, hence the "peel & stick" step shown in the picture. If you don't like the position, you can move it. Once you like the placement, you iron it down and, with this product you apply steam. Once pressed and steamed, it is fused permanently. Steam-A-Seam 2 has worked well for me in the past. It is also available in Lite-Steam-A-Seam 2, which also creates a permanent bond but has a lighter feel after bonding. Use of a light table and a pencil for tracing a design from a pattern or picture on to the backing paper, is recommended.
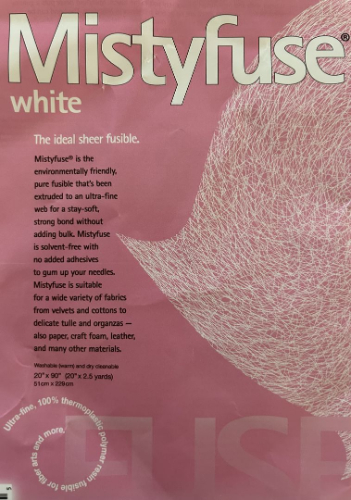
The newest fusible product I have seen is called Mistyfuse. It is an extruded ultra-fine web and is extremely sheer with no structured fabric or material included. The package boasts that it is "environmentally friendly". There is no paper backing.
I have no experience using Mistyfuse, so I went looking for someone who might know something about it. I found a YouTube video from the Collage Quilter, Emily Taylor, entitled "Comparing Fusibles". This video is very informative and well done. The presenter evaluates and compares 6 products, shows how to use each product, quilts each fused item while you watch, and shows how each product performed during and after being quilted. The products include: Lite Steam-A-Seam 2, Steam-A-Seam 2, Soft Fuse, Wonder Under, Heat N Bond, and Misty Fuse. Every product, except Misty Fuse, comes with a paper backing and features a tacky adhesive that holds it in place temporarily, without the heat of the iron.
The two Steam-A-Seam products, the Wonder Under and Heat N Bond yielded pretty much the same results. The end result feels a bit stiff and provides a permanent bond after ironing in place. The lite Steam-A-Seam 2 was not as stiff, Emily called it "moderately stiff".
The Soft Fuse as its name indicates finishes softer than the 4 products above. It can be pulled off after fusing with the iron and moved again and ironed in place over and over. It does not create a permanent bond. Sewing down the item creates the final bond.
The Mistyfuse allowed the fabric piece to be moved and replaced even after ironing. It was thin and pliable and easy to sew through. The bond is not permanent, and the fabric piece can be removed and re-placed again and again, but it does leave residual glue where it was ironed down. After sewing, any unsewn edges may let go from the background fabric to which it was fused. Like Soft Fuse, the end result for Misty Fuse feels softer than the permanently bonding products.
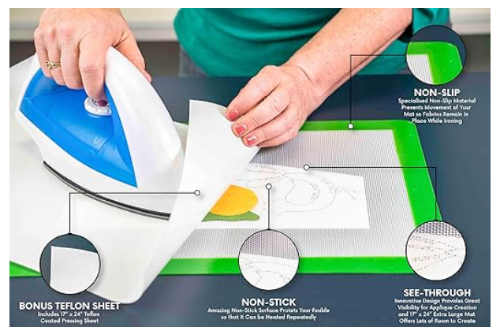
If you work with fusibles, even periodically, I recommend that you obtain a pressing mat especially for fusing. In 2021, I purchased the 17" x 24" Precision Fusing Mat with a free non-stick 17" x 24" pressing sheet, as shown below:
The mat itself is a silicon product, and the pressing sheet is a Teflon product. This mat and pressing sheet combo have saved my ironing board and iron from fusible glue messes and has increased the reliability of the project I was fusing. The mat comes in a variety of sizes, but this size works well for me. I clean up both the mat and the pressing sheet with white vinegar to remove any residue. The iron still gets some residue on the sole plate, but it cleans up well with white vinegar and/or the Mr. Clean Dry Eraser as mentioned in the February 2026 Tidbit.
Well, that is it for this tidbit. Thanks to Renee Jeske for another great topic idea. I learned quite a bit about fusibles doing the research for this tidbit. I hope you did too. Please let me know if you would like me to research one of your ideas and turn it into a tidbit. Have a great March and blessings to you and your family.
 Turn On/Off Automatic Slide Show (Forward Direction)
 Turn On/Off Automatic Slide Show (Reverse Direction)