

| | Home | Board | Calendar | Education Tidbits | | Members | Newletters | Programs | Philanthropy | Slide Shows | Sign In | |

November 2025
6 TIPS TO IMPROVE FLYING GEESE UNITS
6 TIPS TO IMPROVE FLYING GEESE UNITS
This month I want to introduce you to an article on tips to improve any flying geese units you may want to create. These units look really great in quilts but sometimes they can be tricky to sew. You really need them to be sewn crisply and accurately to look right. I don't know about you but angles and triangles have a way of wiggling away from me and my flying geese can look like they have a bad wing or something.
To make flying geese, each unit will consist of a rectangle and two contrasting squares. You sew the two squares with diagonal seams on the rectangle. First sew the one on the left, press, cut away the excess, open and press again. Then sew the one on the right of the rectangle, press, cut away the excess, open and press again. (If you prefer, you can begin on the right and then move to the left, your choice) This technique is much like snowballing.
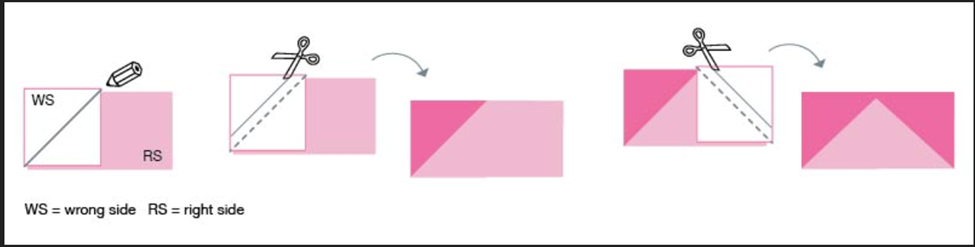
FYI - Something I learned while reviewing this topic, the squares are the geese, and the rectangle is the sky. I always thought the rectangle was the goose. Anyway, I want to thank my good friend Shari Riter for suggesting this topic.
I have not been able to get permission to reprint the article or its pictures so I have included a link at the end of this tidbit so you can go there and read the article in its entirety.
The article includes easy to follow information and lots of very clear pictures. I will summarize the six tips here.
Tip 1 - mark the squares diagonally using a thin marking tool
Tip 2 - if your sewing machine sucks points down inside, start sewing in the middle of the diagonal, reposition under the needle to turn and go the other way to get the whole seam sewn - or switch to a straight stitch plate on your sewing machine featuring a smaller needle hole so the fabric is not sucked in
Tip 3 - if your units are turning out too small, try sewing about 2 threads away from the diagonal line (sew away from the diagonal on the side where you will cut away the excess fabric later) - this gives you more room when you fold the unit open
Tip 4 - after sewing, set the seams with a hot iron before opening the unit
Tip 5 - trim multiple flying geese units at once by carefully lining them up on a cutting mat, using an acrylic ruler and rotary cutter to trim off the excess
Tip 6 - when joining two flying geese units put the unit (whose point will be in the seam) on top for sewing.
If you don't want to use the link to reach the article, go to your search browser and type in: 6 Tips to Improve Flying Geese Units - and it should come up under AllPeopleQuilt.com. This article was published May 22, 2024.
https://www.allpeoplequilt.com/6-tips-to-improve-flying-geese-8649951
Happy November and December. Blessings to you and your family. Have a great Thanksgiving. I plan to skip December and be back in January with a new tidbit. I am still researching a great topic recommended by our own Renee Jeske.

Please e-mail the Webmaster for any problems with the website or any questions: webmaster@crazyquiltersguild.org
|
November 2025
6 TIPS TO IMPROVE FLYING GEESE UNITS
6 TIPS TO IMPROVE FLYING GEESE UNITS
This month I want to introduce you to an article on tips to improve any flying geese units you may want to create. These units look really great in quilts but sometimes they can be tricky to sew. You really need them to be sewn crisply and accurately to look right. I don't know about you but angles and triangles have a way of wiggling away from me and my flying geese can look like they have a bad wing or something.
To make flying geese, each unit will consist of a rectangle and two contrasting squares. You sew the two squares with diagonal seams on the rectangle. First sew the one on the left, press, cut away the excess, open and press again. Then sew the one on the right of the rectangle, press, cut away the excess, open and press again. (If you prefer, you can begin on the right and then move to the left, your choice) This technique is much like snowballing.
FYI - Something I learned while reviewing this topic, the squares are the geese, and the rectangle is the sky. I always thought the rectangle was the goose. Anyway, I want to thank my good friend Shari Riter for suggesting this topic.
I have not been able to get permission to reprint the article or its pictures so I have included a link at the end of this tidbit so you can go there and read the article in its entirety.
The article includes easy to follow information and lots of very clear pictures. I will summarize the six tips here.
Tip 1 - mark the squares diagonally using a thin marking tool
Tip 2 - if your sewing machine sucks points down inside, start sewing in the middle of the diagonal, reposition under the needle to turn and go the other way to get the whole seam sewn - or switch to a straight stitch plate on your sewing machine featuring a smaller needle hole so the fabric is not sucked in
Tip 3 - if your units are turning out too small, try sewing about 2 threads away from the diagonal line (sew away from the diagonal on the side where you will cut away the excess fabric later) - this gives you more room when you fold the unit open
Tip 4 - after sewing, set the seams with a hot iron before opening the unit
Tip 5 - trim multiple flying geese units at once by carefully lining them up on a cutting mat, using an acrylic ruler and rotary cutter to trim off the excess
Tip 6 - when joining two flying geese units put the unit (whose point will be in the seam) on top for sewing.
If you don't want to use the link to reach the article, go to your search browser and type in: 6 Tips to Improve Flying Geese Units - and it should come up under AllPeopleQuilt.com. This article was published May 22, 2024.
https://www.allpeoplequilt.com/6-tips-to-improve-flying-geese-8649951
Happy November and December. Blessings to you and your family. Have a great Thanksgiving. I plan to skip December and be back in January with a new tidbit. I am still researching a great topic recommended by our own Renee Jeske.